
Portal 2: Bridging the Gap
Solo Student Environmental Puzzle Design Project at DigiPen Institute of Technology
Roles: Puzzle Designer, Level Designer.
Tools: Portal 2 Level Editor.
Skills: Environmental Puzzle Design, Level Design, Design Iteration, Tutorialization, Playtesting.
Genre: First-Person, Puzzle-Adventure Game.
Target Audience: Portal 2 Players.
Reception: Map 4 Holds a 5 Star User Rating on Steam Workshop with over 500 User Scores.
Environmental Puzzles
Environmental Puzzles are a core element to creating challenges in game content, and likewise, they often serve a role in the storytelling and worldbuilding of an experience. To practice and improve my puzzle design and level design skills, I developed this series of Portal 2 maps to challenge my ability to take a simple premise, and evolve on it over the course of subsequent challenges. You can take a look at my process for designing and iterating on the maps below!

Setting a Skill Theme
Unlocked Doors and Broken Bridges

Traversal Puzzles
Starting out, my first step was identifying what parts of Portal 2's systems and levels resonated with me the most. I decided that solving problems that invited new opportunities for traversal were the parts of the game that most resonated with me.
In the case of this exercise, I wanted to make the kind of levels that I would enjoy playing, and so I did some brainstorming of how I could use the components from the Portal 2 level editor to build traversal puzzles.
I decided that my maps would each feature an exit that is not locked, and so the challenge would focus on figuring out how to get to the exit, instead of figuring out how to unlock the exit. This rule would work as a design pillar, and is what I ended up reinterpreting as my skill theme as well.
After some prototyping, I decided that part of the way I would achieve this is by utilizing a recurring idea of constructing a runway that the player could use to "bridge the gap" to the exit of the test chamber. Constructing the runway and using it to reach the unlocked exit would be the core premise that all of my levels build themselves around, and the challenge of each level would then be about figuring out how to do create the path forward.

Initial Designs
My First Pass Process

Filling the Gaps
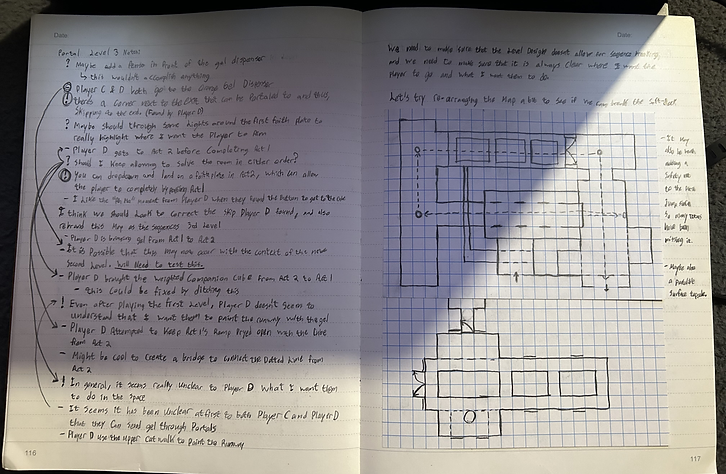
I like to work closely with a design journal while I work, so to the right, you can see the progression of my design journal notes and ideas!
There were a few key elements of the levels that I had in mind from the beginning, and so these were the first pieces to make their way into the maps (pictured below). Having these elements as focal points let me figure out what I would need to teach the player before they got to each element, which allowed me to work backwards. The other thing it did was let me think about how I would evolve on the elements themselves, which would help me figure out what should come next.
My early plans intended to evolve on the concepts further than I really ended up needing to. Originally, I planned to include all of the different gel types, not just the orange speed gel, but what I realized when I started playtesting was that I was making a lot of assumptions about what the player would be able to piece together on their own. Because of this, there was a lot of missing tutorialization and slow introductions of individual pieces of content that would need to be worked in leading up to or in between different parts of the levels. Making sure that content was in was way more important than pushing the concept further. It wouldn't matter how many evolutions of the scenario I could create if the player wasn't able to get past the early iterations, so I switched my focus to making sure all the content would be digestible (quality over quanity).


Playtesting and Iteration
Refining my Level Designs

Testing, and more Testing
Once I had levels ready for people to play, I put them in front of my friends and family (many of whom don't play video games) to see what their experience playing the levels would look like.
I took TONS of notes and used graph paper to think about my level layouts while watching people play, and made notes of where something wasn't coming across clearly, where I was making leaps in logic, where my sight lines needed to improve, where I could work more verticallity into the level design, or where there was opportunity to simplify my designs or reframe something in an interesting way. With all of those thoughts in mind, I would go back into the editor and make the changes as quickly as I could so that I could put new versions back in front of players for more testing. I really felt like GLADOS a lot of the time haha.
Not one level I made stayed even remotely similar to the way they started, and often pieces or ideas from one level would be moved to completely different levels altogether.
One decision I made early on was to not worry about the final level until I was happy with the other four levels to come before it. My thinking with that choice was that I would learn a lot from the iteration process of what came before, and I would have a more vivid idea of what I was putting an end cap on. While this meant I didn't get started on that level until very late in development, in my own opinion, I think it made that level better, and I think it's my personal best work out of the bunch!

Level Gallery and Reception
A look at my Final Works

A Gallary of my Designs
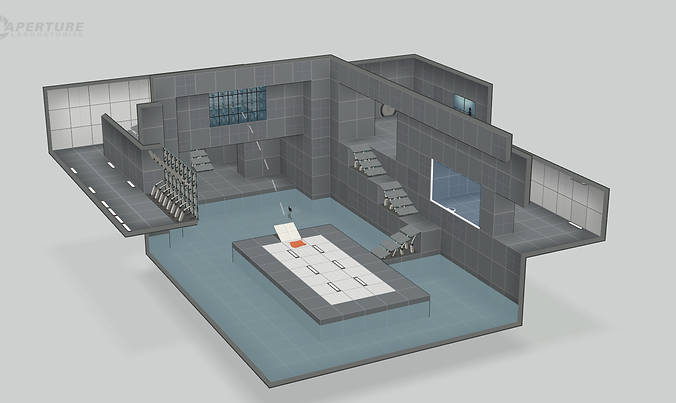
Below is a look at each of the levels I created for this project, including the 5-Star Rated Map 4! Each map is complete with any additional notes related to the level, as well as video footage and links to where you can play the levels for yourself!
Map I


Map II


Map III


Map IV


Map 4 Holds a 5-Star Rating on Steam with over 500 ratings!

Map V


-
Map 5 is the final map I designed from the set, and as a result, I built it with all of the lessons learned in mind from the previous four levels. I feel it is my strongest work of the set.
-
For this level, I made a flip-book sort of thing in to my notebook so that I could better think about the 3D space in the level and how different pieces fit on top of each other.